Introduction:
Let your users withdraw their WooWallet balance to the bank and other digital accounts like PayPal with this awesome addon.
Plugin Installation:
Download the plugin zip file (woo-wallet-withdrawal.zip) from https://woowallet.in/my-account/api-downloads/
Installing via uploaded ZIP file
To install this plugin directly from the admin area then log in to your WP admin area and follow the below steps.
Step 1. Go to Plugins > Add New.
Step 2. Click on the “Upload Plugin” button from top-left.
Step 2. Click Choose File and select the woo-wallet-withdrawal.zip file you downloaded from https://woowallet.in/my-account/api-downloads/.
Step 3. Click on the “Install Now” button.
Step 4. When done, click Activate Plugin.

Installing manually at the server
To install this plugin you just need to put the plugin files into the wp-content/plugins directory. Once a plugin is installed, you may activate it or deactivate it from the Plugins menu in your WP administration.
License Activation:
To get the auto update of this plugin please follow the below steps and activate your copy.
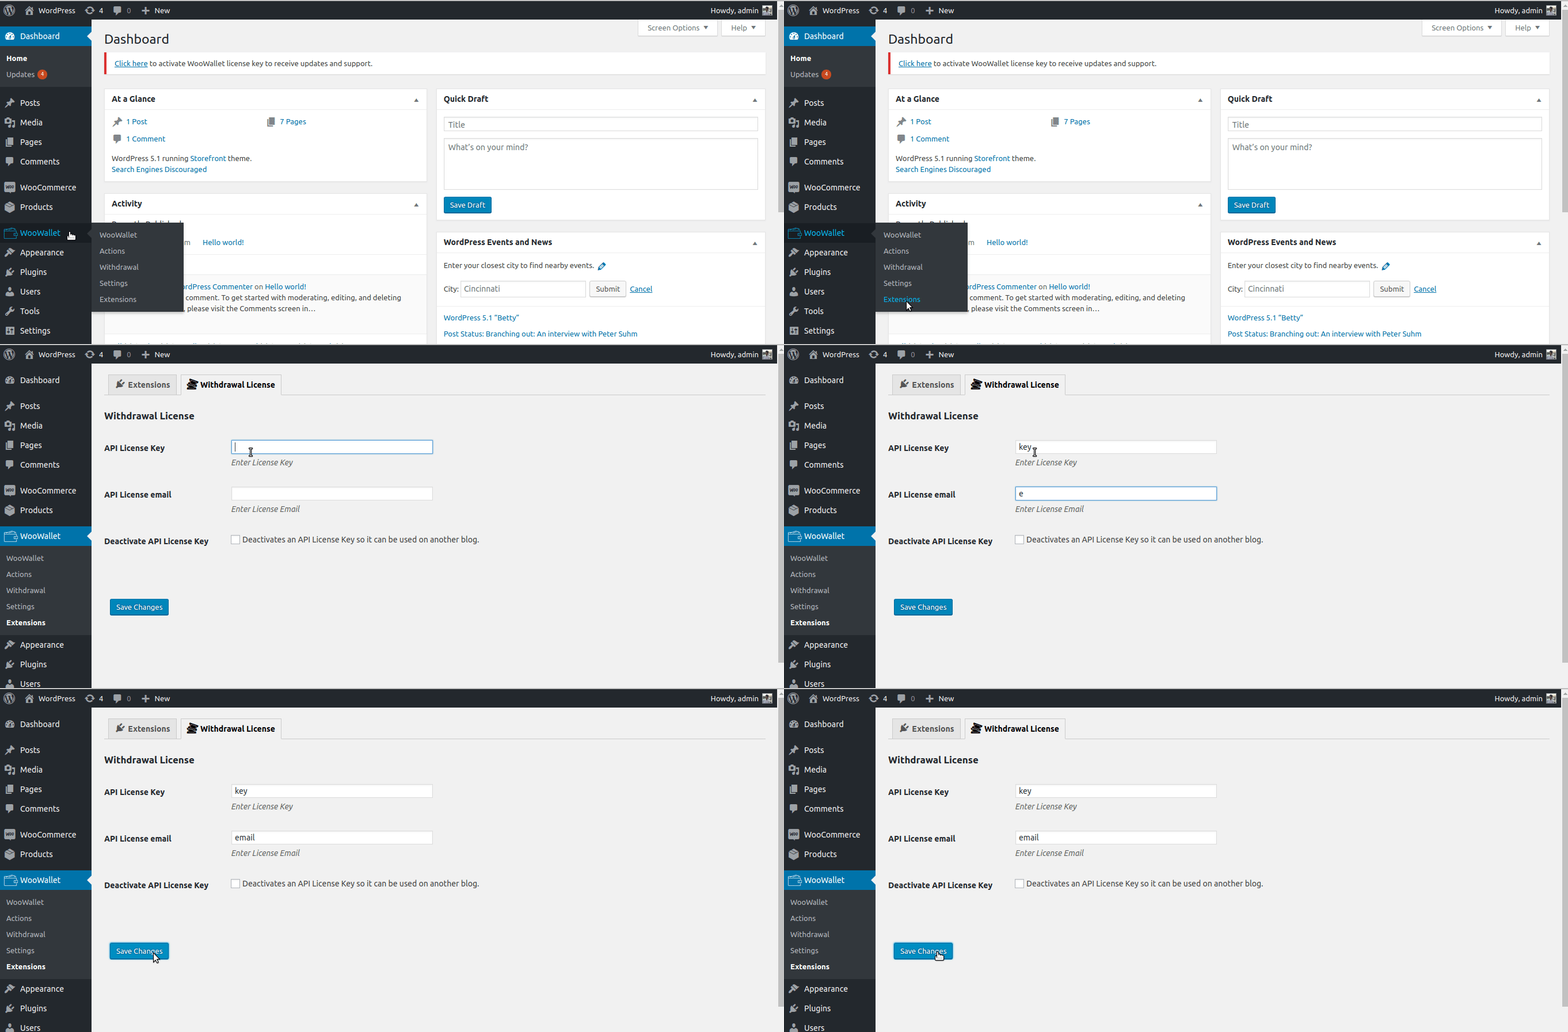
Step 1. Go to Admin panel > WooWallet > Extensions.
Step 2. Select the “ Withdrawal License” tab.
Step 3. Enter your “API License Key” and “API License email”.
Step 4. You can deactivate/activate by check/uncheck the “Deactivate API License Key” field.
Step 5. Click on the “Save Changes” button.

Configuration:
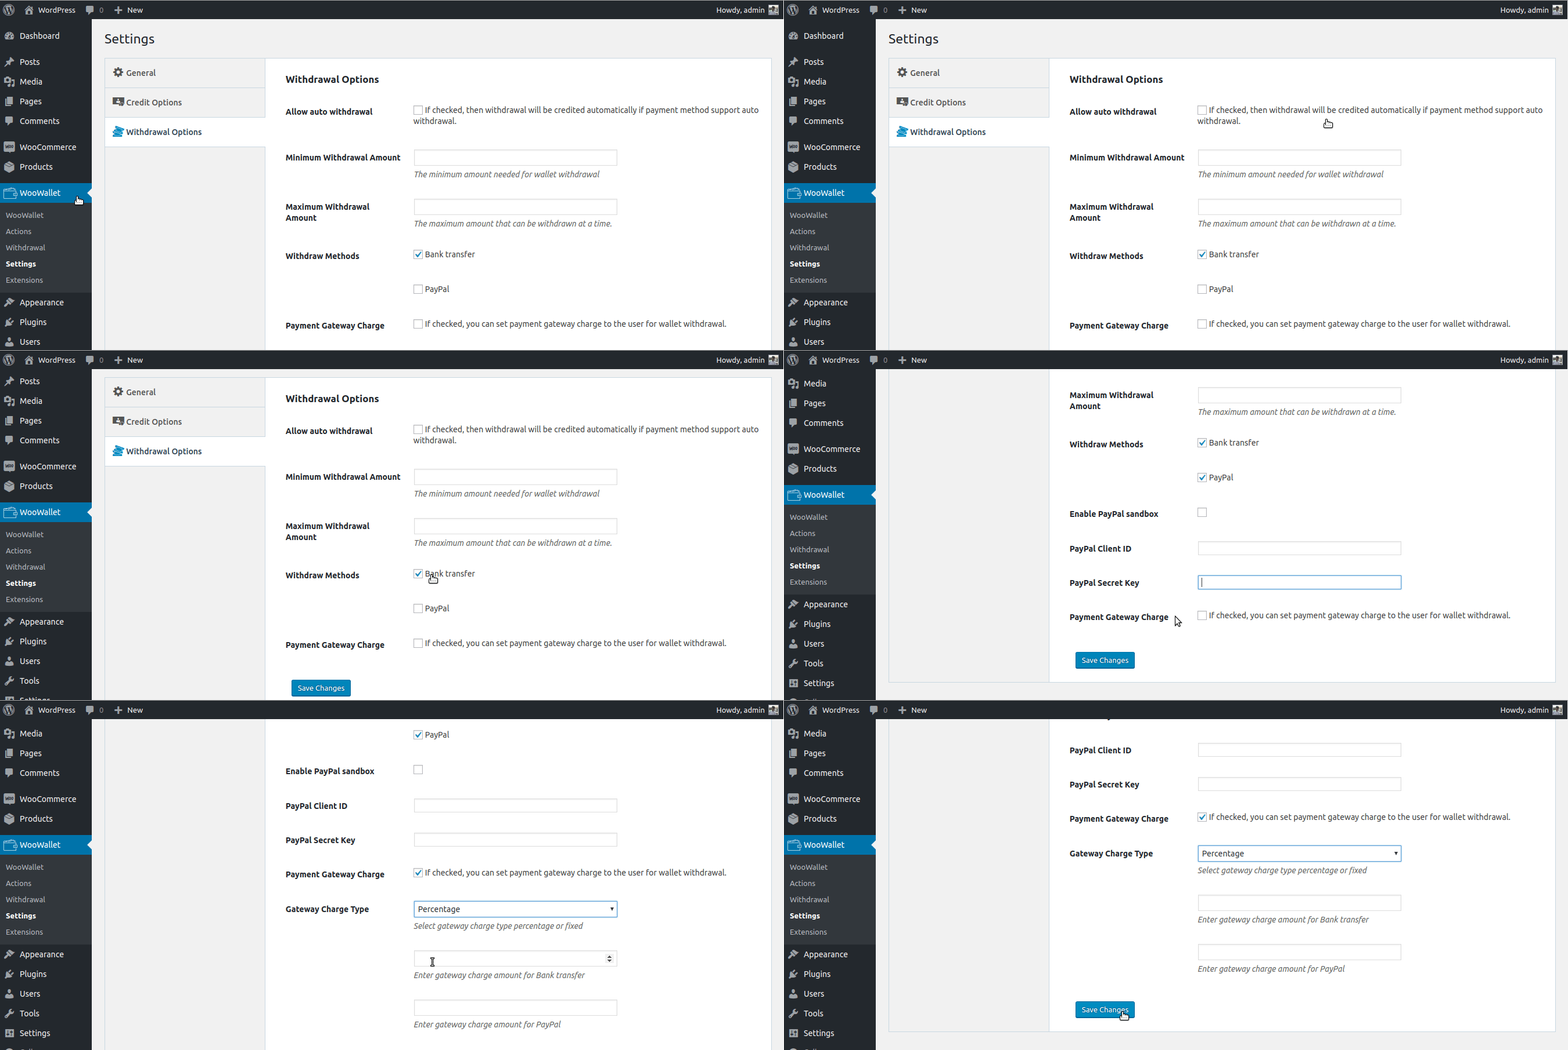
Please go to Admin panel > WooWallet > Settings > Withdrawal Options.
Here the fields are
- Allow auto withdrawal – If it is checked, then withdrawal will be credited automatically (* if payment method supports auto withdrawal ).
- Minimum Withdrawal Amount – You can set a minimum limit for withdrawal. Please enter a number without any currency unit and symbol except the decimal point. Users can request for withdrawal if they have the amount which you have entered in this field. Leave it blank if you don’t want to set a minimum limit.
- Maximum Withdrawal Amount – Enter a number without any currency unit and symbol except the decimal point, if you want to set a maximum withdrawal limit. At a time users can request the amount for withdrawal which you have entered in this field if they have more than that amount in their wallet.
Different Methods of Withdrawal
Supported payment methods:
- Manual Bank transfer
- PayPal
- Stripe
- CashFree (Support only INR)
If “PayPal“ is checked, you will find three options
- Enable PayPal sandbox – From here you can enable or disable to use sandbox account of PayPal.
- PayPal Client ID – Here you need to add the Client Id of PayPal.
- PayPal Secret Key – Here you need to add the Secret Key of PayPal.
and also have an option for charges of different Payment Gateway that is “Payment Gateway Charge” -> If checked, you can set payment gateway charge to the user for wallet withdrawal.
From “Gateway Charge Type” you can choose the type of charges ( Percentage and Fixed Amount ) from a drop-down.
Then Enter gateway charge amount for different payment methods.
When complete all the set-up about Withdrawal process please click on the “Save changes” button.

Withdrawal Request:
Users can Withdraw their balance by requesting to the site administrator. A user gets the requested amount if the site administrator approves the withdrawal request. To create a new withdrawal request please navigate to My account > My Wallet and click on the “Withdrawal” menu.
There are four tabs 1) Withdraw Request, 2) Approved Requests, 3) Cancelled Requests and 4) Payment Settings.
- Withdraw Request – From here users can enter “Withdraw Amount” and choose the “Payment Method” from dropdown as per their choice
( * PayPal — If “Allow auto-withdrawal” field is checked from the back-end, the requested amount will automatically send to the user PayPal account if all the details are right. If it is not checked then the request need to approve by the site admin.
* Bank transfer — It is the manual process. Site admin sends the requested amount manually to the requested user’s bank account ) then need to click on the “Submit Request” button to send the withdrawal request.
After submitting a request successfully it will display a table with the request details. The logged-in user can not create the next request until the previous one is approved or canceled by the site administrator.
- Approved Requests – It will display all the approved requests of logged-in user in a table view.
- Cancelled Requests – It will display all the cancelled requests of logged-in user in a table view.
- Payment Settings – From here users can set up their bank account details and PayPal email.
Note: Need to set up Bank Account details/ PayPal email if the user chooses Bank transfer / PayPal as Payment Method.

Manage Withdrawal Request:
Admin can approve withdrawal requests from Admin panel > WooWallet > Withdrawal.
There is a table with 7 columns (User, Amount, Gateway Charge, Status, Method, Date, Actions).
At present 4 icons are in the “Actions” column
- Eye icon – By clicking this icon site admin can see the requested withdrawal details.
- Yes icon – Site admin can approve the request by clicking this icon.
- No/Cross icon – Site admin can reject the request by clicking this icon if anything is wrong.
- Trash/Delete icon – To delete the request permanently need to click this icon.
From “Bulk Actions” drop-down admin also can Approve, Reject, Delete, Download PayPal MassPay CSV for multiple requests by checking the checkbox of check column.
Also, Withdrawal Requests are filtered by date from another drop-down right side of “Bulk Actions” drop-down then click on the “Filter” button.

